- Android 培训
- 序言
- 1. Android入门基础:从这里开始
- 2. Android分享操作
- 3. Android多媒体
- 4. Android图像与动画
- 5. Android网络连接与云服务
- 6. Android联系人与位置信息
- 7. Android可穿戴应用
- 8. Android TV应用
- 9. Android企业级应用
- 10. Android交互设计
- 11. Android界面设计
- 12. Android用户输入
- 13. Android后台任务
- 14. Android性能优化
- 15. Android安全与隐私
- 16. Android测试程序
Intent的发送
编写:kesenhoo - 原文:http://developer.android.com/training/basics/intents/sending.html
Android中最重要的特征之一就是可以利用一个带有action的intent使得当前app能够跳转到其他的app。例如:如果你的app拥有一个地址想要显示在地图上,你并不需要在你的app里面创建一个activity用来显示地图。你只需要使用Intent来发出查看地址的请求。Android系统则会启动能够显示地图的程序来呈现那个地址。
正如在1.1章节:建立你的第一个App(Building Your First App)中所说的,你必须使用intent来在同一个app的两个activity之间进行切换。在那种情况下通常是定义一个显式(explicit)的intent,它指定了需要启动组件的类名。然而,当你想要叫起不同的app来执行某个动作(比如查看地图),则必须使用隐式(implicit)的intent。
这节课会介绍如何为特殊的动作创建一个implicit intent,并使用它来启动另外一个app去执行intent中的action。
建立隐式的Intent
Implicit intents并不会声明需要启动的组件的类名,而是声明一个需要执行的动作。这个action指定了你想做的事情,例如查看,编辑,发送或者是获取什么。Intents通常会在发送action的同时附带一些数据,例如你想要查看的地址或者是你想要发送的邮件信息。数据的类型取决于你想要创建的Intent,这些数据可能是Uri,或者是其他规定的数据类型,或者根本不需要数据也是有可能的。
如果你的数据是一个Uri,会有一个简单的Intent() constructor 用来定义action与data。
例如,下面是一个带有指定电话号码的intent。
Uri number = Uri.parse("tel:5551234");
Intent callIntent = new Intent(Intent.ACTION_DIAL, number);
当你的app通过执行startActivity()来启动这个intent时,Phone app会使用之前的电话号码来拨出这个电话。
下面是一些其他intent的例子:
- 查看地图:
// Map point based on address
Uri location = Uri.parse("geo:0,0?q=1600+Amphitheatre+Parkway,+Mountain+View,+California");
// Or map point based on latitude/longitude
// Uri location = Uri.parse("geo:37.422219,-122.08364?z=14"); // z param is zoom level
Intent mapIntent = new Intent(Intent.ACTION_VIEW, location);
- 查看网页:
Uri webpage = Uri.parse("http://www.android.com");
Intent webIntent = new Intent(Intent.ACTION_VIEW, webpage);
另外一些需要extra数据的implicit intent。你可以使用 putExtra() 方法来添加那些数据。
默认的,系统会根据Uri数据类型来决定需要哪些合适的MIME type。如果你没有在intent中包含一个Uri, 则通常需要使用 setType() 方法来指定intent附带的数据类型。设置MIME type 是为了指定哪些activity应该接受这个intent。例如:
- 发送一个带附件的email:
Intent emailIntent = new Intent(Intent.ACTION_SEND);
// The intent does not have a URI, so declare the "text/plain" MIME type
emailIntent.setType(HTTP.PLAIN_TEXT_TYPE);
emailIntent.putExtra(Intent.EXTRA_EMAIL, new String[] {"[email protected]"}); // recipients
emailIntent.putExtra(Intent.EXTRA_SUBJECT, "Email subject");
emailIntent.putExtra(Intent.EXTRA_TEXT, "Email message text");
emailIntent.putExtra(Intent.EXTRA_STREAM, Uri.parse("content://path/to/email/attachment"));
// You can also attach multiple items by passing an ArrayList of Uris
- 创建一个日历事件:
Intent calendarIntent = new Intent(Intent.ACTION_INSERT, Events.CONTENT_URI);
Calendar beginTime = Calendar.getInstance().set(2012, 0, 19, 7, 30);
Calendar endTime = Calendar.getInstance().set(2012, 0, 19, 10, 30);
calendarIntent.putExtra(CalendarContract.EXTRA_EVENT_BEGIN_TIME, beginTime.getTimeInMillis());
calendarIntent.putExtra(CalendarContract.EXTRA_EVENT_END_TIME, endTime.getTimeInMillis());
calendarIntent.putExtra(Events.TITLE, "Ninja class");
calendarIntent.putExtra(Events.EVENT_LOCATION, "Secret dojo");
Note: 这个intent for Calendar的例子只使用于>=API Level 14。
Note: 请尽可能的定义你的intent更加确切。例如,如果你想要使用ACTION_VIEW 的intent来显示一张图片,你还应该指定 MIME type 为
image/*.这样能够阻止其他能够 "查看" 其他数据类型的app(比如一个地图app) 被这个intent叫起。
验证是否有App去接收这个Intent
尽管Android系统会确保每一个确定的intent会被系统内置的app(such as the Phone, Email, or Calendar app)之一接收,但是你还是应该在触发一个intent之前做验证是否有App接受这个intent的步骤。
Caution: 如果你触发了一个intent,而且没有任何一个app会去接收这个intent,那么你的app会crash。
为了验证是否有合适的activity会响应这个intent,需要执行queryIntentActivities() 来获取到能够接收这个intent的所有activity的list。如果返回的List非空,那么你才可以安全的使用这个intent。例如:
PackageManager packageManager = getPackageManager();
List<ResolveInfo> activities = packageManager.queryIntentActivities(intent, 0);
boolean isIntentSafe = activities.size() > 0;
如果isIntentSafe是true, 那么至少有一个app可以响应这个intent。如果是false则说明没有app可以handle这个intent。
Note:你必须在第一次使用之前做这个检查,若是不可行,则应该关闭这个功能。如果你知道某个确切的app能够handle这个intent,你也应该提供给用户去下载这个app的链接。(see how to link to your product on Google Play).
使用Intent来启动Activity
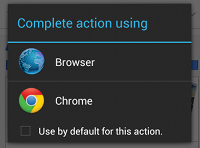
当你创建好了intent并且设置好了extra数据,通过执行startActivity() 来发送到系统。如果系统确定有多个activity可以handle这个intent,它会显示出一个dialog,让用户选择启动哪个app。如果系统发现只有一个app可以handle这个intent,那么就会直接启动这个app。
startActivity(intent);

下面是一个完整的例子,演示了如何创建一个intent来查看地图,验证有app可以handle这个intent,然后启动它。
// Build the intent
Uri location = Uri.parse("geo:0,0?q=1600+Amphitheatre+Parkway,+Mountain+View,+California");
Intent mapIntent = new Intent(Intent.ACTION_VIEW, location);

// Verify it resolves
PackageManager packageManager = getPackageManager();
List<ResolveInfo> activities = packageManager.queryIntentActivities(mapIntent, 0);
boolean isIntentSafe = activities.size() > 0;

// Start an activity if it's safe
if (isIntentSafe) {
    startActivity(mapIntent);
}
显示分享App的选择界面
请注意,当你以startActivity()的形式传递一个intent,并且有多个app可以handle时,用户可以在弹出dialog的时候,选择默认启动的app(通过勾选dialog下面的选择框,如上图所示)。这个功能对于用户有特殊偏好的时候非常有用(例如用户总是喜欢启动某个app来查看网页,总是喜欢启动某个camera来拍照)。
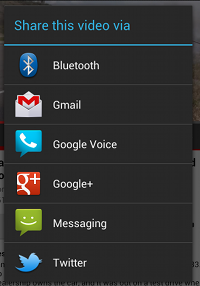
然而,如果用户希望每次都弹出选择界面,而且每次都不确定会选择哪个app启动,例如分享功能,用户选择分享到哪个app都是不确定的,这个时候,需要强制弹出选择的对话框。(这种情况下用户不能选择默认启动的app)。

为了显示chooser, 需要使用createChooser()来创建Intent
Intent intent = new Intent(Intent.ACTION_SEND);
...

// Always use string resources for UI text. This says something like "Share this photo with"
String title = getResources().getText(R.string.chooser_title);
// Create and start the chooser
Intent chooser = Intent.createChooser(intent, title);
startActivity(chooser);
这样就列出了可以响应createChooser()中Intent的app,并且指定了标题。